
Troubleshooting a Freezer with a Raspberry Pi and DS18B20 Thermometer
When we moved into our house, it included a GE Profile PFS22SISDSS refrigerator. It rates pretty awful among consumers with a number of complaints about the smart circuits failing to maintain temperature. The troubleshooting for this situation is generally just "unplug it to recycle the onboard computer." This naturally bugs me since refrigeration technology is just shy of 200 years old and this computer failed at doing it's one job ... ONE JOB ... keep shit cold.
Nevertheless, I thought everything would be taken care of via my home warranty. Well, it would ... if the inspection team could actually witness the problem. The freezer on the PFS22SISDSS may spontaneously warm up from 0°F to nearly 27°F and stay there for an hour or so, but it generally stays at the correct temperature. There odds are unlikely that the freezer will misbehave when the service technician arrives which will simply cost me a service fee for nothing.
But what if ... I had data on my side? I needed to log the actual freezer temperatures over a period of time so that I could try and correlate the problem to something. Well, maybe the service tech could correlate it. I just needed to gather evidence to know how often it happened, how long it happens for, and when it happens. Thankfully, there are Raspberry Pis and sensors.
The DS18B20 sensor is a dirt simple, three wire device that can interface to the Raspberry Pi over the GPIO pins. I could simply run the cable with the sensor into my freezer and leave it there over the course of several days to collect the necessary information.
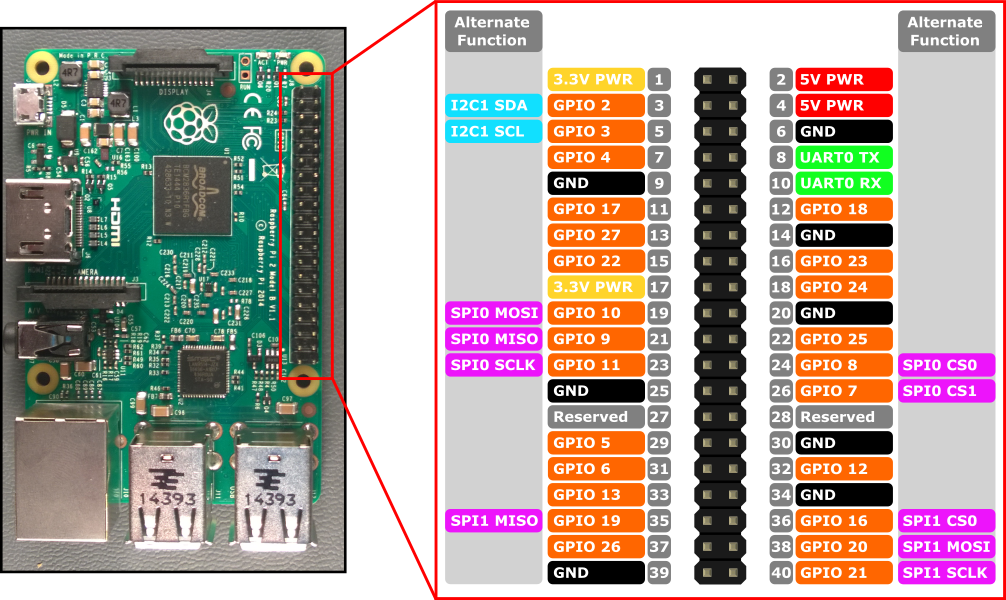
To make the DS18B20 work, it needs to be connected to the Raspberry Pi's 3.3V power, ground, and GPIO pin 4. Additionally, a 4.7K ohm resistor must connect between the data and 3.3V pins. Some kits (like this one) include jumper wires and a simple PCB with the resistor already in place.
It is possible to connect the data pin to any of the Raspberry Pi's GPIO pins. It will simply be necessary to issue the appropriate commands instructing that pin to be read.
Connect to Ground (pin 6, 9, 14, 20, 25, 30, 34, or 39) Connect to GPIO 4 (pin 7) |
 |
In order for the device to be accessed, activate the one wire interface using the raspi-config utility from the command-line. Select option 5 Interfacing Options and then select option P7 1-Wire. Toggle the feature to Yes and reboot if necessary.
Getting the temperature readout from the DS18B20 is an easy task. Firstly, make sure the appropriate drivers are loaded:
sudo modprobe w1-gpio
sudo modprobe w1-therm
sudo dtoverlay w1-gpio gpiopin=4 pullup=0
Next, list the devices detected on the GPIO pin and look for the unique, 64bit serial number associated with your DS18B20. In my case, a file entry for 28-0302979438d3 was now available.
ls /sys/bus/w1/devices
Viewing the w1_slave entry within your DS18B20 device will show you the current data on two lines, confirming it's validity and the temperature in Celsius. For example, -19437 means the current temperature is -19.437°C or -2.98°F:
cat /sys/bus/w1/devices/28-0302979438d3/w1_slave
c9 fe 55 05 7f a5 a5 66 c6 : crc=c6 YES
c9 fe 55 05 7f a5 a5 66 c6 t=-19437
In order to capture a running history of data, simply configure a 5 minute cron job to run a simple script. Use awk to extract just the temperature from the device output. Then slice the string and echo it with a timestamp to a continuously appending logfile.
RAW=`awk '/t=/ { print $10}' /sys/bus/w1/devices/28-0302979438d3/w1_slave`
TMP=${RAW:2}
echo `date` == $TMP >> ~/freezer.log
Lastly, set your temperature probe into the freezer and begin collecting data for several days/weeks. In only a few days of collecting, my freezer has already demonstrated that it warms up randomly by 25°F for 30 minute intervals. One might argue this is a feature to prevent frosting, except that when the freezer behaves this way, half of it frosts over even more than normal.
The analysis ran for about two weeks, collecting approximately 4000 data points. The overall average temperature, based on the data, within the freezer was in fact 0°F which is where it was set. Initially, the data shows that roughly every 14 hours, the freezer did in fact warm up - presumably as a countermeasure against frost buildup. Most of those "warming cycles" lasted about 30 minutes but while the freezer did begin cooling down, it often took nearly 2 hours to regain the designated temperature. Plotting the data also reveals enough anomalies to be pretty sure this freezer isn't working properly - but not on a predictable enough pattern for a service tech to witness.